Minggu, 28 Juni 2009

Happy Birthday!

Time has zoomed passed so fast that unknowingly, another year has gone by. It seems like my son has grown up at such a tremendous speed that I have no choice but to accept that he is a big kid now. Looks like I have only a few more years to have him all for myself before he spreads his wings and embraces his own world.

To celebrate his birthday, I baked him a special cake which is a combination of both his all-time favourites...oreo cookies and durian! Even though my younger boy protested...he won't eat any durians, I still went ahead to make it as the rest of us are all durian lovers ;)


As I was expecting a crowd, I made an 8" cake by adapting my favourite 7" sponge cake recipe. I was glad that the sponge cake turned out well as I was really just trying my luck to meddle with the ingredient amount! I whipped up some non-dairy cream and added in some durian pulp. It tasted yummy! Then I sliced the sponge cake into three layers and sandwiched each layer with some non-dairy whipped cream followed by a layer of fresh durian pulp. The cake was then covered with the left over durian whipped cream mixture before it was covered generously with lots of oreo cookie crumbs.


Except for a couple of kids who are non-durian lovers, all the guests enjoyed the cake. The durain was really good...it was very creamy and came with very thick flesh and had got a bitter sweet taste. An excellent choice to please both 'camps' of durian lovers...those who prefer sweet durians vs those who just love a stronger bitter taste. It's a pity I didn't have the chance to take a photo of a slice of cake. Even though I love the cake, I doubt I would make it again any sooner as I really couldn't stand the stinky fridge after having this durian cake sitting in it all night!

I will post the recipe unless there are many requests for it since not everyone likes durian ;)

(As there are a number of requests, I have posted the recipe here.)

Ingredients:
(makes one 20cm cake)

Ingredients A:
130g cake flour
4 eggs, room temperature
120g caster sugar
30g unsalted butter, melted
40ml fresh milk
1 teaspoon vanilla extract

Ingredients B:
50g durian flesh (pureed)
300ml non-dairy whipping cream

Ingredients C:
150g durian flesh (pureed)

Ingredients D:
1 tablespoon sugar
60ml (4 tablespoons) hot water

Method:

To make the sponge cake:
  1. Sift cake flour, set aside. Line the sides and bottom of a 20cm (8 inches) round pan with parchment paper, set aside. Pre-heat oven to 170degC. Position rack at the lower bottom of the oven.
  2. With an electric mixer, whisk eggs and sugar on HIGH speed for about 5 to 7 mins, until the batter double in volume and is ribbon-like (the beater should leave a ribbon-like trail when the batter is lifted up). Turn to LOW speed and whisk for another 1 to 2 mins. Whisking at low speed helps to stabilise the air bubbles in the batter.
  3. Add sifted cake flour into the batter in 3 separate additions. Gently fold in the flour with a spatula each time the flour is added. Take care not to deflate the batter.
  4. Add the melted butter, fold with spatula until well blended
  5. Add in fresh milk, vanilla extract and fold in gently with spatula.
  6. Pour the batter into the pan and bake for 30~35 mins, or until a skewer inserted in the centre comes out clean. Unmold and invert onto cooling rack, remove parchment paper and let cool completely.

    To make the filling:
  7. Blend durian flesh (Ingredient B) until the pulp becomes smooth*. (As the durian flesh is quite thick, the blade of your blender may not work properly, stir the mixture with a spoon or add one or two teaspoons of water to get it going. *Depending on preference, blend the durian flesh to the desired consistency, I didn't blend it till very smooth, there were still tiny chunks of durian pulp/fibre.) Do the same for Ingredient C.
  8. With an electric mixer, whisk non-dairy whipping cream till stiff. Add the 50g of durian puree to the whipped cream. Fold in with a spatula, blend thoroughly. (Depending on the consistency of the durian puree, tiny bits of durian fibre would be visible in the whipped cream mixture.)

    To assemble:
  9. Dissolve the sugar in hot water (Ingredients D). Let cool.
  10. Slice the cake horizontally into 3 layers. Place one layer of the sponge cake on a 20cm cake board. Brush the surface of the sponge layer with the sugar syrup (this is to keep the sponge layers from drying out upon chilling).
  11. Spread about 1.5 cups of filling evenly on the sponge layer. Spread half of the durian puree (Ingredient C) evenly over the filling.
  12. Brush both sides of the second layer of sponge cake with the sugar syrup and place it over the first layer. Spread with 1.5 cups of filling followed by the remaining durian puree.
  13. Brush both sides of the last layer of sponge cake with the sugar syrup and spread the remaining filling on the surface and sides evenly. Leave the cake to chill in the fridge for at least 3~4 hours.
  14. Remove cake from fridge and cover the whole cake with crushed oreo cookie crumbs (remove the fillings between the cookies) and decorate as desired. Keep the cake in the fridge before serving.

Kamis, 18 Juni 2009

from Ice Cream to Cake

Just like the fast few years, I made a cake to celebrate this year's Father's Day, last Sunday.


It was only two days ago that I realised that Father's Day falls on this Sunday, I got it mixed up with Mother's Day...which is the second Sunday in May. I kept thinking that it is also the same for Father's Day :')

Anyway, it was a good thing that we celebrated the occasion one week earlier, as we will be celebrating another occasion this coming weekend.


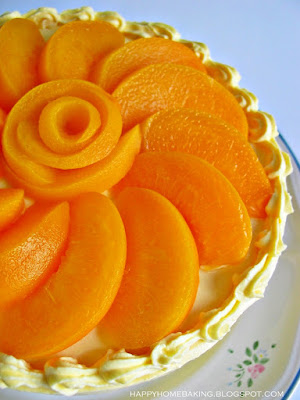
I am no good at frosting a cake, so I always have to rely on other ingredients to make the cake 'presentable'. Canned peaches happen to be one of the few fool-proof ingredients I have been using on countless occasions.


Although I have made a mango yoghurt cake, my lack of skills have prompted me to fall back on peach slices...again!


Very much inspired by Small Small Baker's mango yoghurt ice cream, I wasted no time to try making it once I got hold of all the necessary ingredients. Thanks to the blender which I have been hoarding, I was able to make my first homemade ice cream! It was so delicious and simple to prepare that I adapted the same ice cream recipe to make the fillings for this layered cake ;)


I liked the way the cake has turned out...the filling tasted almost similar to the ice cream version, light and refreshing! The layering was quite even as I was diligent enough to use a measuring cup to measure out equal amount of filling for each layer. I would have added chunks of fresh mangoes in between the fillings if I had any spare mangoes. I am sure it will make this cake even more delicious.


Peach & Mango Yoghurt Cake

Ingredients:
(makes one 18cm cake)

for the sponge cake:
100g cake flour
3 eggs, room temperature
90g caster sugar
20g unsalted butter, melted
2 tablespoons fresh milk
1 teaspoon vanilla extract


for the filling:
150g fresh mangoes
50g caster sugar
150g mango flavoured yoghurt (I used peach & mango flavour)
250g (250ml) non-dairy whipping cream
1 tablespoon gelatin powder
3 tablespoons (45ml) water

Method:
To make the sponge cake:
  1. Sift cake flour, set aside. Line the sides and bottom of an 18cm (7 inches) round pan with parchment paper, set aside. Pre-heat oven to 170degC. Position rack at the lower bottom of the oven.
  2. With an electric mixer, whisk eggs and sugar on HIGH speed for about 5 to 7 mins, until the batter double in volume and is ribbon-like (the batter should leave a ribbon-like trail when the beater is lifted up). Turn to LOW speed and whisk for another 1 to 2 mins. Whisking at low speed helps to stabilise the air bubbles in the batter.
  3. Add sifted cake flour into the batter in 3 separate additions. Gently fold in the flour with a spatula each time the flour is added. Take care not to deflate the batter.
  4. Add the melted butter, fold with spatula until well blended
  5. Add in fresh milk, vanilla extract and fold in gently with spatula.
  6. Pour the batter into the pan and bake for 30~35 mins, or until a skewer inserted in the centre comes out clean. Unmold and invert onto cooling rack, remove parchment paper and let cool completely.

    To make the filling:
  7. Measure water into a bowl and sprinkle in the gelatin (without stirring with a spoon). Set aside to allow the gelatin grains to swell (10 mins) before setting the bowl over a pot of simmering hot water. Stir with a spoon and once the gelatin melts, remove the bowl from the pot and set aside to cool to room temperature.
  8. Blend mangoes, sugar, yoghurt until the mixture becomes smooth.
  9. With an electric mixer, whisk non-dairy whipping cream till stiff. Fold in the whipped cream to the mango mixture. Blend thoroughly.
  10. If desired, remove about 1 cup of the above mixture, set aside to use for piping.
  11. Add in the gelatin solution to the remaining mixture, mix well.

    To assemble:
  12. Slice the cake horizontally into 3 layers. For each layer, trim away the sides by about 2~3mm, so that the resulting layers are slightly smaller than 18cm. (This is to make sure the mango filling can cover the sides of the sponge layer.)
  13. Place one layer of the sponge cake in an 18cm round pan with a removable base (or use a cake ring or springform pan). Spread about 1.5 cups of mango filling on the sponge layer. Repeat with the second layer of sponge cake, followed by the filling. Place the last layer of sponge cake and spread the remaining filling on the surface evenly. Gently tap/bang the pan on the table to remove any empty air pockets in between the sponge layers and the filling. Leave the cake to chill in the fridge for at least 3 ~4 hours.
  14. Remove cake from fridge, unmold and decorate as desired (pipe rosettes or borders using the reserved mango filling in step 10). Keep the cake in the fridge before serving.
(Note:
*This cake can be made with a 20cm (8") pan, the resulting cake will be slightly shorter.
**To arrange the peach slices as what I have done, start by arranging the outer ring of peach slices. To make the rosette in the middle, slice peach slices till very thin. Arrange these thinly sliced peaches in concentric circles...work from the outside towards the inside. The outermost peaches will provide support for the inner ones to prevent it from sliding. Hope I am clear with my description.)

Selasa, 16 Juni 2009

Great Food Fast

Another weekday lunch express meal:


baked potatoes with homemade creamy mushroom soup.


It was my maiden attempt at making creamy soup. I have always wanted to make cream of mushroom soup but most recipes would call for an electric food pureer, be it a food processor, a handheld pureer or a blender. I do not own any of these kitchen gadgets, and I don't have any intention to get any of them as I know I would probably use them once in a while. A couple of months ago, I borrowed a blender (on a long-term loan basis) so that I could make smoothies for the kids. It didn't occur to me until much later that I could actually use it to make creamy homemade soup.


To cut down on baking time, I boiled the Russet potatoes until they were fork-tender before wrapping them up with foil and baked in the oven for another 10 mins or so. I served the baked potatoes with some butter and tuna flakes sprinkled with black peppers and dried parsley.


This soup was also a short-cut version! I simply stir-fried some garlic and fresh button mushrooms with some salt and black pepper, then add cream and water and cooked the mixture for about 20mins. The mixture was then pureed in the blender before returning to the pot to bring it back to a boil. The consistency was not as thick as I would like, so I added in two slices of Emmental sandwich cheese...which was what I had in the fridge. It tasted good! The next time I were to make this again, I would have to use more mushrooms; and probably make some crusty buns to go with it. It was indeed a hearty lunch, most importantly, my kids enjoyed this simple meal as much as I did.


Senin, 08 Juni 2009

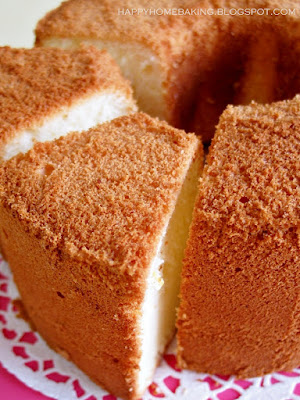
Lemon Chiffon Cake

I am getting more and more comfortable with making a chiffon cake.


I no longer feel like having a stomach full of butterflies whenever I need to whip the egg whites, although I still can't really tell whether it has reached the stiff peak stage?! I am still not getting the hang of folding the whites to the yolk mixture though. Sometimes...maybe, I could have over-whipped the white a little, or maybe the yolk mixture was too thick...incorporating the whites into the yolk never seems to be as easy as stated in every chiffon cake recipes "Gently fold the egg whites into the batter just until blended, taking care not to deflate the batter." I usually take very much longer than expected, and I doubt I have ever been gentle when performing the act. Even watching demo video clips on youtube doesn't seem to help :(


Well, at least I am getting really good at unmolding the cake from the tube pan. Most of the time I am able to get it out without causing too much damage to the golden brown crust ;) The trick is to use a very thin-bladed knife.


The other obstacle I have yet to overcome is the oven temperature. It was only last week that I realised all the while I have been baking with my not-so-up-to-standard table-top oven. First of all, it is a small oven, just 20 litres, compared to one that is 40 litres. It doesn't come with a fan, and it has only one set of heating element that is located on the top. Most good ovens come with two sets of heating elements, top and bottom, and with a fan for circulation which helps to create an even temperature. I would think my oven is just slightly better than a toaster oven. No wonder, I always have problem baking a chiffon cake. Without fail, the oven temperature will drop by 20 degC when the cake goes in, so I always had to set it higher than the recommended temperature. The cake will rise high over the rim during baking, however, close to the finishing time, it will start to shrink, even before I take it out of the oven. Sometimes I have to tent the top of the cake as my oven is so small that the top of the tube is not more than 2 inches away from the heating element, while the bottom of the pan is only 1 inch away from the base of the oven, not forgetting I am using a small 7 in" tube pan.


Anyway, enough of complaining...with the ample supply of lemons in the fridge, I managed to bake a Lemon Chiffon Cake the other day. I didn't have time to search for a suitable recipe, so I tweaked my favourite Earl Grey Chiffon Cake recipe and turned it to a lemon flavoured cake.

My little experiment was a success. The texture of the cake was not affected, it was moist and tender. I like the mild and light lemony flavour which was not too tangy. It was great for breakfast, and was excellent served with a cup of afternoon tea.


Lemon Chiffon Cake

Ingredients
(makes one 18cm cake)

100g cake flour
1 1/2 teaspoons baking powder
1/2 teaspoon salt
3 egg yolks
40g caster sugar
50ml vegetable oil
50ml water
25ml lemon juice
zest of 1 lemon

3 egg whites
40g caster sugar

Method:
  1. Sieve flour, baking powder and salt together, set aside.
  2. Separate egg yolks/whites and bring to room temperature. (It is easier to separate eggs when they are cold.)
  3. Place egg yolks in a mixing bowl, add sugar in 3 separate additions and with a manual whisk, whisk till the mixture becomes sticky and turns pale.
  4. Drizzle in the oil, whisking at the same time till the mixture is well combined. Repeat the same with the water, followed by the lemon juice. Sieve over the flour mixture and whisk until flour mixture is fully incorporated into the batter. Add in the lemon zest and mix well.
  5. In a clean, dry mixing bowl, beat egg whites with an electric mixer until mixture becomes frothy and foamy. Gradually beat in the sugar and beat on high speed until  just before stiff peaks form* (after note: after several attempts at baking chiffon cakes, I learned that the whites should be beaten until just before stiff peaks form).
  6. Add the beaten egg white into the egg yolk batter in 3 separate additions, each time folding gently with a spatula until just blended.
  7. Pour batter into a 18cm (7 inch) tube pan (do not grease the pan). Tap the pan lightly on a table top to get rid of any trapped air bubbles in the batter.
  8. Bake in pre-heated oven at 170 degC for 45 ~ 50mins or until the cake surface turns golden brown, and a skewer inserted into the centre comes out clean.
  9. Remove from the oven and invert the pan immediately. Let cool completely before unmould. To remove the cake from the pan, run a thin-bladed knife around the inside of the pan and the center core. Release the cake and run the knife along the base of the pan to remove the cake.

Rabu, 03 Juni 2009

Is it a Tart or a Pie?

I couldn't help but grabbed 6 lemons when I saw them on the supermarket cart two weeks ago. They look so fresh and are much larger than the usual ones I bought. It was such a good deal, I got them at 35 cents each, almost half of what I usually have to pay.


With such beautiful lemons, I thought I should really get my hands to work on this Lemon Meringue Pie recipe which I have been keeping for the past two years. I didn't have the courage to take up the challenge to make such a pie as the recipe looks so intimidating which entails putting three totally different parts together. I am comfortable with making the crust, but the lemon fillings requires the use of the stove, something which I am really bad at it; and till now it remains a mystery whether I have been beating the egg whites correctly? On top of that, I have never even tasted a lemon meringue pie!

Anyway I felt very brave the other day, and went ahead to give it a try. After looking through the recipe, I didn't like that the pastry crust requires more butter than the usual tart recipe that I am familiar with. So I made the crust by adapting the peach tart recipe, which is a good thing, since I do not own a pie pan or a dish, I could turn it to a tart instead of a pie.


As usual, before I jump-in to make something alien, I looked up the internet for more information. It is interesting to learn that besides the type of pan to use, there are other differences between a lemon meringue Pie and a lemon meringue Tart. The filling of a lemon meringue Pie comes in the form of a custard, made with little or no butter and uses cornstarch or flour for thickening. While a lemon meringue Tart is filled with lemon curd which does not contain cornstarch or flour. The filling for the Tart contains more lemon juice and zest than the custard filling of a Pie. The lemon curd is made with butter which makes the texture smoother and creamier.

Another general difference between a Pie and a Tart is the amount of filling that goes into it. A Pie will hold more filling as compared to a tart since it is baked in a deeper pan. With the sheer amount of filling, the sides of a Pie would collapse if it were removed from its pan, and for this reason, pies are usually served from their baking pans. With less filling in a Tart, the crust plays a more prominent role in terms of texture and flavour, and so, it is important to make sure the crust is tasty.


With the above findings, I realised that what I have made is neither a Lemon Meringue Pie or a Lemon Meringue Tart :')

The filling is meant for a pie but since I used a tart pan, it is now a tart. Other than the crust, I followed the rest of the recipe rather closely. I even attempted to pipe a 'decorative' border around the rim of the tart. I have meant to pipe 'shells' just like the ones in the recipe, however, with zero skills and knowledge on piping, I ended up with just a border of undulating waves!

If you were to do a search on lemon meringue pie, it is inevitable that you will come to know that the meringue can actually "weep". Although I tried to follow some of the tips here, here and here to prevent my pie from crying, my tart still weeps a little. It also doesn't help that the meringue in this recipe is made the "Italian way"...that is, a hot sugar syrup is added to the beaten egg whites to cook it...this is suppose to make the meringue more stable. Well, besides my lousy skills plus my unreliable oven, I have nothing else but the humid weather to blame for my sobbing tart.


Other than the weeping bit, I really like the taste of this dessert. I am also surprised at the interesting flavours it offers...a combination of a little sweetness and a little tartness. The meringue on top is pillowy soft, fluffy, and sweet, very much like biting into cotton candies. The custard filling is very refreshing with the right tartness that balances well with both the sweet meringue and the crust. I'll have to classify this tart under the category: 'can't stop at just one slice'.


Lemon Meringue Tart/Pie

Ingredients:
(makes one 18cm tart)

Pastry Crust:
100g cake flour
30g caster sugar
40g unsalted butter , soften at room temperature
1 tablespoon (15g) lightly beaten egg

Filling:
250ml milk
3 egg yolks
60g caster sugar
25g cornstarch
30g unsalted butter, cut into cubes
zest of 1 large lemon
juice of 1 large lemon (about 70-80 ml)
(use a strainer to remove any seeds and pulp from the juice)

Meringue
3 egg whites
50g caster sugar

sugar syrup:
3 tablespoons water
100g caster sugar


Method:
    For Pastry Crust:
  1. Lightly grease an 18cm tart pan, set aside. Sieve flour, set aside.
  2. With a manual whisk, cream butter and sugar till light and fluffy. Dribble in the egg, whisk and mix well. Sieve over the flour in 2 to 3 additions into the batter. Fold the mixture gently with a spatula each time the flour is added.
  3. Form and shape the pastry into a round disc. Roll out the pastry in between 2 sheets of baking paper or 2 sheets of cut-out plastic bags, to about 23cm in diameter. Remove one side of the baking paper. Carefully flip the pastry over the prepared tart pan. Remove the other baking paper. Mould the pastry into the tart pan, smoothing the edges and the rim carefully. If the pastry is too soft to handle, chill it in the fridge for 10~15 mins.
  4. Chill the moulded pastry in the fridge for 20mins. (This helps to prevent the pastry from shrinking too much after baking.)
  5. Use a fork to prick holes on the pastry surface. Brush the top of the rim with egg wash. Bake in pre-heated oven at 180 degC for 10~12 mins until the edges turned slightly browned. Let cool completely.
  6. For Filling:
  7. In a mixing bowl, with a manual whisk, whisk egg yolks with a little bit of the milk. Add in sugar and corn flour, mix well.
  8. In a saucepan, bring the remaining milk to a simmer. Remove from heat and add the hot milk gradually to the yolk mixture, whisk to combine. Pour the mixture over a sieve and return it to the saucepan. Boil the mixture on Low heat, stirring constantly with a wooden spoon until the mixture just starts to boil. When it boils, continue to stir constantly for another 1 minute, the mixture will become very thick and very difficult to stir. It is important to stir the mixture constantly as it cooks so that it thickens but doesn't turn lumpy or get burnt at the bottom.
  9. Remove mixture from heat and whisk in the butter, lemon zest and lemon juice. Pour the filling into the baked pastry crust and smooth the top. Chill tart in fridge.
  10. For Meringue:
  11. To make the sugar syrup: in a saucepan, stir water and sugar and bring the syrup to a boil. Turn to low heat.
  12. In a clean mixing bowl, with an electric mixer, beat the egg whites until soft peaks form. Gradually add the sugar and continue to whip at the same time until stiff peaks form.
  13. Slowly drizzle it the hot sugar syrup into the beaten egg white in a steady stream and continue to beat the mixture at the same time until the egg white becomes thick and glossy.
  14. With a spatula, pile the tart surface with about 2/3 of the meringue. Shape the meringue into a tall dome and gently press down on the meringue to get rid of any air pockets. Make sure the edges are all covered with the meringue, leaving no filling exposed. Work quickly before the meringue starts to cool and set, make a few decorative swirls and peaks with the back of a spoon. Place the remaining meringue in a piping bag and pipe a decorative border on the rim of the tart. Bake the tart in a pre-heated oven at 230 degC for 2 to 3 mins or until the meringue is lightly browned. Remove from oven and let cool. Refrigerate until ready to serve. Best served on the day it is made.