Selasa, 29 Maret 2011

thru their viewfinders

During the recent term break, DH was back to spend the one week school holidays with us. We took on the opportunity and went on a makan trip (makan, a Malay word, which means to eat) to Malacca, Malaysia. It was a 3 hours drive away from Singapore, we left home at 6.30 in the morning and didn't return before nine in the evening. We practically ate our way throughout the day trip...from breakfast to dinner ;)


My boys were the official photographers of our trip. So, come join me, to get a glimpse of Malacca through their viewfinders...


Once we crossed the Woodlands checkpoint, we went straight to Ah Soon Bak Kut Teh for breakfast. Since we were early, we were the very first patrons...the place was empty as business would only begin at 8am. The eatery was a rather old and traditional coffee shop...not a familiar sight for my kids. Nowadays, you can hardly find such old coffee shops in Singapore.


I chanced upon this eatery while googling for a place to have our breakfast in Johor Bahur. The bak kut teh was good, not too peppery or salty, and it didn't have too strong a herbal taste, more over, the soup was boiled in a claypot over charcoal. The tao pok (deep fried bean curd) was really good...it was the best I have eaten!

can you spot the giant pineapple tarts?

The first thing we got into the town of Malacca was to look for parking space. We were lucky to get a parking lot along a side street...it was just a few steps away from the famous Jonker Street. We bought parking coupons from a nearby shop and my kid had fun scratching the coupon away...yes, unlike our parking coupons, the Malaysia coupons are more entertaining...and a lot more cheaper ;)


Our first must try on our food list was Malacca's signature dish...chicken rice balls...Hainanese chicken rice with the rice shaped like a ping pong (or rather fish ball) sized ball. You can find at least 3 shops that are famous for this dish at Jonker Street. During our previous trip to Malacca, we ate this dish at Hoe Kee, this time, we went to Chung Hwa. Just look at the long queue outside Chung Hwa. We didn't have to wait too long as we were there just before the lunch crowd. Compared to Hoe Kee, I find Chung Hwa's chicken rice balls softer and taste better. The chicken was tender and my younger kid actually declared that it was the best chicken he had tasted.


After the chicken rice ball fix, we went strolling along Jonker Street. We must have walked up and down Jonker Street at least 4 times!


Just before our trip, a friend suggested that we have peranakan or nyonya food at this Nancy's Kitchen. I didn't think too much about it and wasn't that keen to include it in our food list. However, when I first got off the car, I looked up and caught sight of this big signage that says "Nancy's Kitchen'. We happened to park right outside this nyonya restaurant, so I thought we might as well give it a try. After our walk along Jonker Street, we returned to this eating place for a late lunch. We ordered a few dishes...stir-fry sweet potato leaves, cincaluk omelette, otak and ayam pongteh (because they had run out of babi pongteh). The food has got a very homely feel to it...both taste and presentation...it was as though the food was dished out right from your kitchen. I find the ayam or chicken pongteh rather delicious, the other dishes were just 'so so' to me. Either those were common dishes that we got to eat here or I think I have yet to really appreciate nyonya food?


The highlight of our makan trip is none other than the chendol at Jonker Dessert 88. We didn't get to try the chendol at this famous dessert stall during our last trip, so, even though we were quite full, we still went for the dessert right after our meal at Nancy's Kitchen. I was a little disappointed when I found the chendol 'just ok'. Of course it is not easy to find chendol that tastes as good as this, but I thought the palm sugar (gula melaka) syrup and coconut milk was a tad too diluted? Was I expecting too much?? 千里迢迢去寻找到的美食...结果切根本不是那回事...(^^''')


Anyway, I found the environment of the dessert shop quite interesting...it actually pride itself as a museum...with old antiques displayed all over the premises. Those Chinese words of wisdom on display at one side of the walls did caught my attention...


We spent the rest of the afternoon taking a walk around the town...


can you spot the bee?
My boys trying their hands at taking macro photos...


Do they look like potential food bloggers?? It was the first family trip that I did not have to take a single picture ;)


We ended our trip with a seafood dinner near the second link. I found this Tian Lai Seafood on the internet. This eatery is located at Gelang Patah which is about 15mins drive away from the checkpoint. The food was good and of course cheap! I am seriously thinking of going back again :)


It was a few nights before the super moon...but the moon was already so big and bright on that night. It was indeed a very pleasant food trip for us...and what can I say? I can't wait to start planning for our next holiday!

Selasa, 22 Maret 2011

fruity march

Most of the time, I am able to get it right the first time...but lately, my baking fairy must have left my kitchen...even a batch of simple chocolate chip muffins I have to make it twice to get it right. Not forgetting those banana walnut muffins which looked horrendous and have got a rubbery crumb (I didn't want to post it, to avoid any visual pollution...), and a banana sponge cake that still needs some improvement.


This is my second fruit tart in two weeks. The first one was made with a crumb crust...a lousy decision I made...the recipe was taken from a book dedicated to nothing but tarts. It is a lazy crust made with digestive biscuits, those biscuit base commonly used for no-bake cheesecakes. Even though the crust was pre-baked in the oven, it was still too fragile and crumbled the moment I tried to cut a slice. This is a classic case of the Hokkian/Chinese saying...利害就好,不要假利害! which means, it is good to be "clever", but not "too clever".


Well, practice makes perfect...especially for self-taught home bakers like me. This time, I learned my lesson and went back to my trusted pastry crust recipe. It takes a few extra steps to prepare it, but the effort does pay off! This pastry crust is made by creaming butter and sugar, followed by egg and flour...slightly different from the more commonly used method of rubbing butter with flour. Maybe that is why it uses a lot less butter?

The creme patissiere or pastry cream is a thick custard filling made by cooking milk, eggs, sugar, some flour over the stove. Corn flour is added to help thicken the mixture. Vanilla pods are usually boiled together with the milk before the seeds are scraped out and added to the mixture. Since I do not have any vanilla pods, I substitute with pure vanilla extract. This pastry cream tastes way better than most store bought tarts which I believe the custard fillings are made with custard powder. I do not have a well trained palette, but I have made enough fruit tarts to be able to tell the difference. The recipe may look super long and complicated, but the crust and pastry cream can be made ahead of time, and when ready to serve, you are left with the simple task of putting them together.


I am submitting this fruity tart to Aspiring Bakers #5: Fruity March hosted by Jess of Bakericious. I am glad I am finally able to participate in this event. Thanks Jess for hosting this round and Small Small Baker for championing this monthly baking event :)


Fresh Fruit Tart
Ingredients:
(makes one 18cm tart)

Pastry Crust:
80g cake flour
20g almond powder (grounded almond)
30g caster sugar
40g unsalted butter, soften at room temperature
1 tablespoon (15g) lightly beaten egg

Pastry Cream:
200ml milk
2 egg yolks
40g caster sugar
1 tablespoon plus 1 teaspoon* cornflour
1 tablespoon plus 1 teaspoon* plain flour
10g butter
2 teaspoons vanilla extract

Toppings:
fresh fruits such as strawberries, kiwi fruits, orange, peaches, etc


Method:

Pastry Crust:
  • Lightly grease an 18cm tart pan (with removable base) with butter, set aside.
  • Toast almond powder at 100 degC for 10 mins. Stirring in between. Let cool.
  • With a manual whisk, cream butter and sugar till light and fluffy. Dribble in the egg, whisk and mix well. Add in the almond powder and fold with a spatula. Sieve over the flour and fold in with the spatula. Gather the mixture to form a dough.
  • Flatten the pastry dough to form a round disc. Roll out the dough in between 2 sheets of baking paper (I used two plastic sheets cut-out from clear plastic bags) to about 23cm in diameter. Remove one side of the baking paper/plastic sheet. Gently lift up the other sheet of baking paper/plastic (with the pastry dough still on it) and flip the pastry dough over the prepared tart pan. Remove the baking paper/plastic sheet. (Don't worry if some parts of the pastry broke off. It can be moulded easily back into the tart pan.) Mould the pastry into the tart pan, smoothing the edges and the rim carefully. (If the pastry is too soft to handle, chill the rolled out dough in the fridge for 10~15 mins before moulding.)
  • Prick the pastry surface with a fork (this helps to prevent the pastry from puffing up when baking). Cover and chill the moulded pastry in the fridge for 20mins (this helps to prevent the pastry from shrinking too much after baking.)
  • Brush the top of the rim with some egg wash (optional). Bake in pre-heated oven at 180 degC for 20~25 mins or until the pastry is lightly golden browned. Let cool before removing the crust from the tart pan.
Pastry Cream:
  • In a saucepan, bring milk slowly to the boil and remove from the heat.
  • In a mixing bowl, with a manual whisk, whisk egg yolks and sugar until the mixture turns pale and thickens (takes a couple of minutes). Sieve over the corn flour and plain flour. Whisk until the mixture becomes smooth (a few quick stir).
  • Add in the hot milk gradually to the yolk mixture, whisk constantly to prevent curdling.
  • Pour the mixture over a sieve and return it to the saucepan. Heat gently, stirring constantly with a whisk or a wooden spoon until the mixture just starts to boil. When it boils, continue to stir constantly for another 1 minute, the mixture will become thick and hard to stir. It is important to stir the mixture constantly as it cooks so that it thickens but doesn't turn lumpy.
  • Remove from heat and whisk in the butter and vanilla extract (or other liqueur such as Grand Marnier, Brandy, Kirsch, Rum as desired).
  • Pour into a clean bowl and cover the surface of the pastry cream with cling wrap (this is to prevent a skin from forming). Set aside to cool completely. Keep in fridge until needed. When ready to use, just whisk it with a spoon and the cream will become spreadable.
To Assemble:
  • Spread the pastry cream evenly onto the pastry crust. Top with sliced fruits. Best serve on the day it is made. Keep for one day if refrigerated.
*Note: for the pastry cream, I only made 2/3 portion as the original recipe is enough to fill a bigger tart. As a result the amount for the corn flour and plain flour was a little unusal!

Recipe Source: adapted from (1) Delicious!! Baked Cakes, Ikuko Omori, (2) Fresh Baked by Louise Pickford

Senin, 14 Maret 2011

Sloppy Joe with a twist

I have watched enough Rachel Ray's show to know what's a Sloppy Joe. But I never seems to get around to make it until I saw a healthy version while browsing through a stack of food magazines. What caught my eyes wasn't the juicy meat sauce between two burger buns, but the fresh crisp wedges of Japanese cucumber at the side. These cucumber wedges will provide a similar visual appearance of long crispy fries and yet spared me the unwanted calories. Sometimes I do eat with my eyes.

I got really interested when I moved on to the list of ingredients. This Sloppy Joe is made with a Japanese twist! The special ingredient used in this recipe is this Japanese curry roux or curry block, easily available at most supermarkets. The recipe looks really promising as I was certain I would be able to get it right the first time.

So, the next thing you see me leaping from the armchair to the kitchen. In less than 30 mins, I transformed that few lines of instructions into a lunch time treat. A big pat on my shoulder :)


Making the ground beef mixture is as quick as making a meat sauce for a pasta dish. A light browning of chopped onions and some minced ginger (don't omit this, it creates a really nice aroma), followed by minced beef, and some water, Japanese curry block and some tomato paste or ketchup, your job is almost done.

I would love to serve this with homemade bread buns, but that would take a lot of pre-planning on my part. So I used store-bought hamburger buns...got them buttered on both sides and lightly toasted with a frying pan, of course you can toast the buns in the oven, but I find using a frying pan really speeds things up. I could assemble one burger while the other was still toasting in the pan.


Instead of sprinkling the cucumber wedges with coarse sea salt and some vinegar as recommended by the recipe, I chose to make a simple wasabi mayonnaise dipping sauce to go with it.

I usually do not strongly recommend my recipes...as the saying goes, one man's meat is another man's poison. This Sloppy Joe is one exception. I am confident that anyone who tries it will find it yumilicious. The Japanese curry roux gives a wonderful twist to this American dish...the taste of the curry is not too overpowering, and yet without it, it will be like sandwiching a tomato-based pasta meat sauce in between two buns. The sauce is thick enough, not too runny, even my younger child could eat it without creating a mess. Whatever sauce that was left behind on his plate, he cleaned it up with the cucumber slices ;)

I am happy to be able add a new item to my family menu...I bet I will have to cook this over a hundred times before my kids will ever get tired of eating it.


Japanese Curry Sloppy Joe

Ingredients:
(serves 2~3)

1/2 yellow onion, finely chopped
1 teaspoon minced ginger
2 tablespoons oil
250g minced beef
35g Japanese curry roux (curry block)
100ml water
2 tablespoons ketchup (I used tomato based pasta sauce)
2 to 3 hamburger buns, spilted, buttered and toasted
2 tomatoes, sliced
1 to 2 Japanese cucumbers, sliced into long thin wedges
2 tablespoons mayonnaise
1 teaspoon wasabi paste (adjust according to taste)

Method:
  1. Slice Japanese cucumbers into long thin wedges, keep in fridge to chill. Mix wasabi and mayonnaise to a smooth consistency, set aside.

  2. Heat oil in a skillet or pan over medium heat. Add onions and ginger and stir fry till lightly browned, about 3~4 mins.

  3. Add minced beef and stir fry, breaking up lumps as it cooks, till well browned about 1~2 mins.

  4. Add curry block, water and ketchup, stir and cook till the mixture thickens, about 1~2 mins. Remove from heat.

  5. Spilt hamburger buns into halves, butter both sides and lightly toast them. For quick and easy toasting, I toast them over a hot frying pan.

  6. Divide tomato slices between toasted buns, top with beef mixture. Serve with cucumber wedges and wasabi mayonnaise on the side.

Recipe source: adapted from Food & Travel magazine

Rabu, 09 Maret 2011

just doodling....

Shhh...armchair chef in the making...please do not disturb...


that's how HHB looks like after going through so many books...of course, she is much rounder and many times fatter than cute pinky piggy!
Well, this is one of the little perks that I get to enjoy being a SAHM (aka full time housewife). Sometimes you will see me lounging around, under bright day light while my working friends are probably slogging away in front of their computers or attending yet, another meeting. Ah K, if you are reading this, please go ahead and envy me ;')

For the past weeks, I have been working very hard...I don't think I was ever that hardworking when I was a student. I am not dreaming to become a chef or a baker...I was just trying to gather as many meal ideas as possible. It is high time I add a few new items to my family meals. I was a complete culinary idiot (I am still one) before I started baking and cooking for my family. Despite reading tons of cookbooks and magazines for the past few years, I am still relatively new to the culinary world, probably because I have been an armchair cook all along ;) I enjoying gawking at illustrations of delicious, lip-smacking dishes, sometimes I even bothered to copy down the recipes, but I hardly transform those instructions into a real dish to be served at my dining table. Most of the time I chicken out...be it due to the ease of getting the ingredients or the techniques or skills required. I tend to move back to my comfort zone, to prepare meals that I could do with my eyes half opened...dishes that I do not have to keep referring to the recipe for fear of missing out some key ingredients, or meals that are oh-so-forgiving that a lazy cook like me could get away with it easily.


sources of my inspiration...free, from the public library
For the last few years, not a single day has passed without me learning something new about food. Yet, I am still hungry for more...

...what about you?


Selasa, 08 Maret 2011

old-fashioned banana cake

I have always wanted to add a fluted tube pan or commonly known as bundt pan to my kitchen collection. However, my old oven seems too small for a 10" cake pan. Now, with a much bigger oven, I didn't wait too long to get my hands on one of those non-stick bundt pans when I dropped by a local baking supply store. There was only one sitting on the shelf, and I thought it must be waiting, all this while, for me ;)

No, it is not a Nordic Ware bundt pan...it is a much cheaper version. As you can see, the ridges on the finished cake is not as clear or distinct compared to those baked with a Nordic Ware pan. But, I am still very happy with it :)


A Bundt pan is a fluted (with indents and ridges) tube pan. The word Bundt is actually a registered trademark of Northland Aluminum Products Inc., the maker of Nordic Ware. Bundt is derived from the German word “bund,” which means “a gathering of people.” Hope over here if you are interested to know the story behind the bundt pan.

A bundt pan is great for making cakes that have got dense batters, eg coffee cakes. Just like a chiffon tube pan, the hole or the tube in the centre of a bundt pan promotes even baking. The fluted sides and ridges provide a greater surface area which produce cakes with more crust. With the attractive design, even for a cake decorating dummy like me, I am able to bake a lovely cake that I am proud to serve it to my guests. With only a light dusting of icing sugar, or a drizzle of icing or chocolate glaze, one can easily bring the already very pretty cake to even greater heights.


This old-fashioned banana cake is a basic cake that anyone can bake at home. I am sure it is also an all time favourite for many of us. Hoping to get a lighter texture, I replaced plain flour with cake flour and reduced the sugar amount slightly, I also sifted the flour twice, so as to incorporate as much air as possible to the batter. If you like a rich, dense and moist texture, then this is not the kind of cake you will like.


The finished cake is something I have aimed to achieve. The crumbs are soft, light and fluffy...not overly moist and yet not on the dry side...I could finish up two slices without feeling full or rather, guilty ;)


My late morning tea...a slice of banana cake with  a cup of 'latte'...my silly attempt at creating latte art, lolz. No, I don't have an espresso machine in my kitchen, just a simple battery operated whisk which I got as a gift, for frothing milk. As the picture couldn't speak for itself, I'll have to explain that I was actually trying to dust a heart on the milk foam...but it turn out like a lump of dirt (^^''') I will work harder on this.


I was blessed with a cool and nice morning today. The storm in the middle of the night has driven all the heat and I was greeted with clear blue sky. My quiet morning break by the window...all gone in 5 minutes. If not for my failed cup of latte, I felt as though I was enjoying a cuppa inside a cafe :)

I hope you had a great morning too...and not forgetting...

Happy 100th International Woman's Day to all of you!


Old-fashioned Banana Cake
Ingredients

150g unsalted butter
2 tablespoons olive oil
150g caster sugar (I cut down to 120g)
2 large eggs, lightly beaten
1 teaspoon vanilla extract
3~4 medium size banana, mashed
4 tablespoons milk, room temperature
240g plain flour (I use cake flour)
1 teaspoon baking soda
1/2 teaspoon baking powder
pinch of salt


Method:
  1. Grease and flour 10" fluted tube pan. Set aside.

  2. Sieve together flour, baking soda, baking powder and salt. Set aside.

  3. With an electric whisk (medium speed) beat the butter until creamy. Add sugar and olive oil and beat till the mixture turns pale, light and fluffy.

  4. Dribble in the eggs gradually and beat till incorporated in the batter.

  5. Add vanilla extract. Beat to combine.

  6. Add mashed banana, stir with a spatula to combine.

  7. Sieve over half of the flour mixture and add half of the milk. Fold the mixture with spatula until the flour is just incorporate into the batter. Repeat with the remaining flour mixture and milk.

  8. Spread batter into prepared pan and bake in pre-heated oven at 180 degC for 35~40 min or until golden brown or a toothpick inserted into the centre comes out clean. Unmold and let cool on a wire rack.

Recipe source: adapted from Food & Travel magazine

Rabu, 02 Maret 2011

where meals and memories are made

my kitchen...the heart of my home...


a place where cakes and bread are baked...


a place where meals and memories are created.


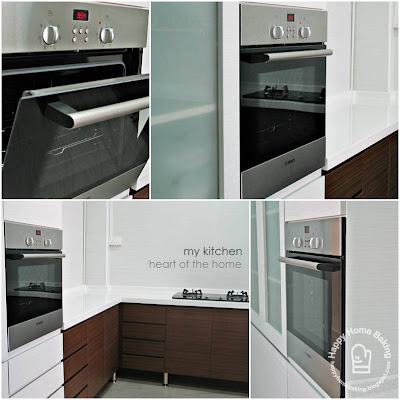
It is with much hesitation that I decided to put up this post. My newly renovated kitchen has got nothing to boast about. It is a far cry from those beautiful kitchens you see on home and deco magazines.  With bare walls on most part of the kitchen, it looks almost half-done. So, please don't laugh as I walk you through my kitchen. Even the 'gas-pipe man' jokingly asked me was it because I do not have enough budget to install the top cabinets (^^''')

But, that is how I wanted my kitchen to be. A place that serves its primary function for cooking simple meals, with utensils easily accessible, enough storage space for a small family, and most important of all, one that requires minimal maintenance. With a higher than usual ceiling height, without the top hung cabinets, I no longer had to climb up a ladder each time I needed to clean them. Even with a ladder, I was not able to reach deep inside the highest shelves. So, unless I am able to grow taller by another 10cm, I would rather do without the extra storage space. The tower cabinet on the other side of the kitchen, furthest away from the cooking area, is built all the way up to the ceiling...which is 3m or almost 10ft high. I am using the uppermost shelves to store...'hopefully never gonna use but cannot be throw away items' aka my husband's military uniforms, boots, full pack, etc.


Here are my squeakily clean stoves...right after I gave them a thorough cleaning. I have opted to get a glass hob over a stainless steel one, again, for ease of cleaning. These gas stove come with inner flames...good for Asian type of cooking...lots of stir frying over high heat, and yet able to adjust to the lowest heat for slow cooking.


My humble kitchen...no expensive pots and pans nor delicate bone china for me to break ;') You are not able to find any crystal glasses, shiny cutlery, nor a single cast iron dutch oven or a standing mixer, not even a food processor. It is equipped with only the bare essentials...basic utensils that I can get by for simple, everyday cooking.

But, it is a place with no shortage of homemade goodies and desserts...a place that is seasoned with love and warmth...a place where I will enjoy preparing meals for my family, and also a place I enjoy keeping it clean and tidy (I hope I won't loose the enthusiasm too soon!).

3D design
My finished kitchen is pretty close to what I had in mind (read about my kitchen design here). The cabinets were built according to my design with a good balance of drawers and shelves. I'll probably add some wall decals to jazz up the empty space a little, but I think an ipad velcroed to the wall will be great...I can watch J. Olivier while trying to re-create some of his recipes ;)


A kitchen is never complete without a fridge. Here's my fridge corner...a place that double-up as a notice board. The fridge is covered with fridge magnets I have collected over the years. I have also reserved the empty space beside it for a future food trolley...that is, if I ever need it.

So, that's it...we have come to the end of the 'tour'. In case you ask, I will do up a review on my oven only after I have tested all the function. Hope you enjoy this little peep into my humble kitchen, and maybe one day, I may just invite you over for a cup of tea ;)